


I've always advised that Scene Builder and FXML are a waste of time, and that you should just write your screens in Java code. It's easier to build, and it's easier to customize, easier to maintain, and much, much easier to do really sophisticated things. But how do you start?
The Beginning
We are going to build an application from the start. So we'll begin with the usual main class that extends Application, and it will look something like this:
public class NoFxmlExample extends Application {

    public static void main(String[] args) {
        launch(args);
    }

    @Override
    public void start(Stage primaryStage) {
        Region sceneRoot = new ScreenBuilder().build();
        Scene scene = new Scene(sceneRoot);
        primaryStage.setScene(scene);
        scene.getStylesheets().add("/css/default.css");
        primaryStage.show();
    }
}
Now, most of that is boilerplate, and the only thing you really need to work out to actually build the screen is to create sceneRoot. I've defined it as a Region, and that's a good starting place, because anything that extends Region is going to work as the root of a Scene. Examples of Regions are BorderPane, ScrollPane, AnchorPane, and StackPane as well as VBox and HBox. Your region can be any one of those, plus a few others I haven't listed.
One thing that we'll get back to later is the stylesheet. It's good practice to put your styling into a stylesheet and then use selectors to apply it to various nodes in your application. I have a "default" stylesheet I use for a lot of projects, so I just went and added it to the Scene here.
A general rule of thumb is that you should only extend classes that you are going to add new functionality to. If you're just configuring them, then you should use a builder class - which is what we are doing here. Personally, I like to use the Builder interface, because it's built-in, obvious and works well. That's what the ScreenBuilder class is, it's an implementation of Builder<Region>.
So let's get to that.
The ScreenBuilder Class
We'll start with just the bare essentials, to get to something that will compile and run as quickly as possible. We want to be able to see our screen as we build it out, so it needs to run right from the get-go.
Because it's an excellent all-round start for a screen that has a basic structure, I've chosen to use a BorderPane:
public class ScreenBuilder implements Builder<Region> {

    @Override
    public Region build() {
        BorderPane results = new BorderPane();
        results.setTop(createTop());
        return results;
    }

    private Node createTop() {
        return new Text("This is the Screen Title");
    }
}
It looks like this:
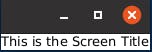
Not pretty, but it's a start. The key point is that now you can see what you've built and exactly how it will look on the screen. In about 6 lines of code!
Some Ideas About Code Structure and Organization
I've started this out the way that I would structure most screen builders. The build() method instantiates the container - in this case a BorderPane - and then each of the sections is built in its own method. These methods all return something generic, like a Node or a Region, and not the actual class of the object being returned. This is for two reasons:
- The calling method should never reach inside the returned value to fiddle with it. All of the configuration should go inside that creation method.
- It's easier to change it later, or to wrap another container around the original returned value. We'll see this in action later on.
By the same token, the creation method should never attempt to reach up to the container to tinker with the layout.
Adding Some Styling to the Heading
To illustrate how the design grows, and where the code belongs, I wrapped the Text in a HBox with a border and made the text bigger. When that was done, it was clear that everything was cramped together too much. The Text was too close to the border, and the border was too close to the edge of the screen. So some space was added. The code now looks like this:
public class ScreenBuilder implements Builder<Region> {

    @Override
    public Region build() {
        BorderPane results = new BorderPane();
        Node headingBox = createHeadingBox();
        BorderPane.setMargin(headingBox, new Insets(4));
        results.setTop(headingBox);
        return results;
    }

    private Node createHeadingBox() {
        HBox results = new HBox();
        Text headingText = new Text("This is the Screen Title");
        headingText.getStyleClass().add("heading-text");
        results.getStyleClass().add("standard-border");
        results.getChildren().add(headingText);
        results.setPadding(new Insets(6));
        return results;
    }
}
There are some things you should notice:
- The creation method for the heading has now been renamed to something more descriptive.
- The creation method for the heading now returns an HBox, instead of a Text, yet the signature of the method did not need to be changed.
- The styling for the Text and the HBox are done in the creation method.
- The internal spacing for the HBox (the padding) is done in the creation method.
- The external spacing for the heading Node is done in the
build()method, as this is an element of the layout of theBorderPane.
Just to be really, really clear about this. No way, no how, should the line:
BorderPane.setMargin(headingBox, new Insets(4));
go inside the createHeadingBox() method. The createHeadingBox() method has no knowledge that it's return value is going to be placed into a BorderPane. So it cannot do this.
Also, since the createHeadingBox() method returns a Node, there's no way that build() can call setPadding() on it.
Layout vs Configuration
An important concept when writing clean JavaFX code is to understand the difference between "Layout" and "Configuration".
Configuration
Configuration is the setting of properties and behaviours of a Node. This can include things like styling, scaling, setting minimum or maximum height and width, visibility, and binding to properties in a Model.
Layout
Layout is the population of a Region with child Nodes and determining their position and bounds, as well as sizing parameters in relation to other elements of the layout.
It's possible, even probable, that a Region will be defined in your code with both Configuration and Layout. We have that so far in our example. The createHeadingBox() method configures the styling for an HBox and then defines it's layout.
You will find that Configuration tends to be less specific to a particular screen than layout. For instance, you'll create a styling for Text that works in a particular context, and then you'll want to re-use that styling throughout a screen, or throughout an application, or even across multiple applications. Once again, this is an important point, as we'll see in a little bit.
Adding A Data Entry Section
We're going bring these ideas together now by adding a GridPane with some prompts and data entry fields. It's going to go in the centre of the BorderPane:
public class ScreenBuilder implements Builder<Region> {

    @Override
    public Region build() {
        BorderPane results = new BorderPane();
        Node headingBox = createHeadingBox();
        BorderPane.setMargin(headingBox, new Insets(4));
        results.setTop(headingBox);
        results.setCenter(createDataEntrySection());
        return results;
    }

    private Node createHeadingBox() {
        HBox results = new HBox();
        Text headingText = new Text("This is the Screen Title");
        headingText.getStyleClass().add("heading-text");
        results.getStyleClass().add("standard-border");
        results.getChildren().add(headingText);
        results.setPadding(new Insets(6));
        return results;
    }

    private Node createDataEntrySection() {
        GridPane results = createTwoColumnGridPane();
        results.add(createPromptText("First Name:"), 0, 0);
        results.add(createInputField(), 1, 0);
        results.add(createPromptText("Last Name:"), 0, 1);
        results.add(createInputField(), 1, 1);
        results.add(createPromptText("Email:"), 0, 2);
        results.add(createInputField(), 1, 2);
        results.add(createPromptText("Phone Number:"), 0, 3);
        results.add(createInputField(), 1, 3);
        return results;
    }

    private GridPane createTwoColumnGridPane() {
        GridPane results = new GridPane();
        results.getColumnConstraints().addAll(createJustifiedConstraint(HPos.RIGHT), createJustifiedConstraint(HPos.LEFT));
        results.setHgap(6);
        results.setVgap(4);
        results.setPadding(new Insets(4));
        results.getStyleClass().add("test-border");
        return results;
    }

    private ColumnConstraints createJustifiedConstraint(HPos alignment) {
        ColumnConstraints results = new ColumnConstraints();
        results.setHalignment(alignment);
        return results;
    }


    private Node createInputField() {
        TextField results = new TextField();
        results.setMaxWidth(100);
        return results;
    }

    private Node createPromptText(String prompt) {
        Text results = new Text(prompt);
        results.getStyleClass().add("label-text");
        return results;
    }
}
Now it looks like this:
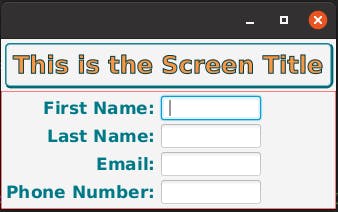
Let's look at what's been done here. First, a new call was added to the main layout section to populate the Centre region of the BorderPane through the createDataEntrySection() method.
That new method creates a GridPane with two columns, and then populates the left column of the GridPane with prompt Texts, and the right column with TextFields.
Notice that the Configuration has been completely split away from the Layout. It might be argued that most of the "configuration" of a GridPane has to do with defining how the layout works, but the important thing is that contents of the GridPane and their positioning in the GridPane are isolated from everything else. That makes it easy to see how the layout works. To that end, all of the configuration of the Texts and TextFields is handled by separate methods.
I've also added a "test-border" styling to the GridPane that will be removed later. One of the things that can be challenging with JavaFX is understanding which region owns the whitespace on the screen. Putting a border around regions is a great way to understand what's really going on.
Using the DRY Principle
There is a lot of boilerplate code in JavaFX.
The key to writing good JavaFX code is to aggressively apply the DRY (Don't Repeat Yourself) Principle whenever you can. The layout of that GridPane would be agonizing to read if the boilerplate for the Texts was repeated inside code, like this:
        Text firstNamePrompt = new Text("First Name:");
        firstNamePrompt.getStyleClass().add("label-text");
        results.add(firstNamePrompt, 0,0);
That's going to add up to 8 extra lines of code in a method that only has 10 lines to start with! Not to mention another 8 lines for the TextFields if they're all defined in-line as well.
This concept is carried over to the creation of the ColumnConstraints for the GridPane as well. It's just two lines of code each time, but the single line of code that's used instead has the advantage of having the method name describing what the ColumnConstraints are for, so it's even easier to read.
Adding Some More Data Entry
We're going to add a TextArea to the screen, to show how the screen design grows and the code is morphed to accommodate it. Rather than repeat the whole class, I'll just show the changed code:
   private Node createDataEntrySection() {
        HBox results = new HBox(10);
        results.setPadding(new Insets(2, 10, 4, 2));
        results.getChildren().addAll(createGridPane(), createBioBox());
        return results;
    }

    private Node createBioBox() {
        TextArea bioTextArea = new TextArea();
        bioTextArea.setWrapText(true);
        bioTextArea.setMaxWidth(200);
        bioTextArea.setMaxHeight(200);
        return new VBox(4, createPromptText("Short Bio:"), bioTextArea);
    }
Now it looks like this:
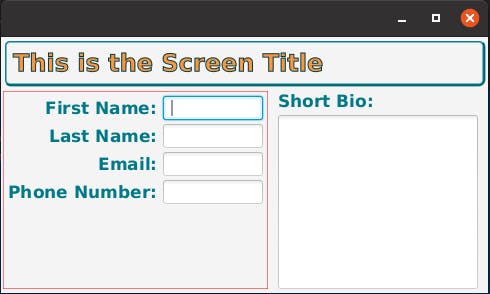
The old createDataEntrySection() was renamed to createGridPane() and a new createDataEntrySection() was written. Essentially, this "pushes" the GridPane down one level in the container structure, as it's now contained in a new HBox which comprises the BorderPane's centre region.
The "BioBox" area is just a VBox with a Text and a TextArea. There's no particular configuration to the VBox, so there no need to even instantiate it into a variable. Just create it and return it. In my opinion, the layout is so simple that there's no need to split it apart from the configuration of the TextArea....yet.
Adding a "Save" Button and Linking to the Outside World
We have this "data entry" section, but the data isn't going anywhere. So we need to add a Model to get the information out of the screen. This article isn't about MVC, so I won't go into much detail about this, but you should be able to see how it works.
Here's a Model:
public class ExampleModel {

    private final StringProperty firstName = new SimpleStringProperty("Alloysius");
    private final StringProperty LastName = new SimpleStringProperty("Smith");
    private final StringProperty email = new SimpleStringProperty("a_smith@reallyexpensiveisp.com");
    private final StringProperty phone = new SimpleStringProperty("(999)888-7777");
    private StringProperty bio = new SimpleStringProperty("This is the life story of Alloysius Smith\n\nHe was born a while ago\n");

    public StringProperty firstNameProperty() {
        return firstName;
    }

    public StringProperty lastNameProperty() {
        return LastName;
    }

    public StringProperty emailProperty() {
        return email;
    }

    public StringProperty phoneProperty() {
        return phone;
    }

    public StringProperty bioProperty() {
        return bio;
    }
}
I've put some default values into the properties of the Model so that we can see how the populated data looks on the screen without having to type it in each time.
I'm not going to do anything with it other than bindings, so I haven't included any getters or setters for the fields, just the "...Property()" methods. It's going to be passed to the ScreenBuilder class in its constructor along with a Runnable to handle the "Save" action (which isn't going to actually do anything in this example):
public class NoFxmlExample extends Application {

    public static void main(String[] args) {
        launch(args);
    }

    @Override
    public void start(Stage primaryStage) {
        Region sceneRoot = new ScreenBuilder(new ExampleModel(), () -> {
        }).build();
        Scene scene = new Scene(sceneRoot);
        primaryStage.setScene(scene);
        scene.getStylesheets().add("/css/default.css");
        primaryStage.show();
    }
}
Now, lets link up the Model and add the Button:
public class ScreenBuilder implements Builder<Region> {

    private ExampleModel model;
    private Runnable saveAction;

    public ScreenBuilder(ExampleModel model, Runnable saveAction) {
        this.model = model;
        this.saveAction = saveAction;
    }

    public Region build() {
        BorderPane results = new BorderPane();
        Node headingBox = createHeadingBox();
        BorderPane.setMargin(headingBox, new Insets(4));
        results.setTop(headingBox);
        results.setCenter(createDataEntrySection());
        results.setBottom(createButtonBox());
        return results;
    }

    private Node createHeadingBox() {
        HBox results = new HBox();
        Text headingText = new Text("This is the Screen Title");
        headingText.getStyleClass().add("heading-text");
        results.getStyleClass().add("standard-border");
        results.getChildren().add(headingText);
        results.setPadding(new Insets(6));
        return results;
    }

    private Node createDataEntrySection() {
        HBox results = new HBox(10);
        results.setPadding(new Insets(2, 10, 4, 2));
        results.getChildren().addAll(createGridPane(), createBioBox());
        return results;
    }

    private Node createBioBox() {
        TextArea bioTextArea = new TextArea();
        bioTextArea.setWrapText(true);
        bioTextArea.setMaxWidth(200);
        bioTextArea.setMaxHeight(200);
        bioTextArea.textProperty().bindBidirectional(model.bioProperty());
        return new VBox(4, createPromptText("Short Bio:"), bioTextArea);
    }

    private Node createGridPane() {
        GridPane results = createTwoColumnGridPane();
        results.add(createPromptText("First Name:"), 0, 0);
        results.add(createInputField(model.firstNameProperty()), 1, 0);
        results.add(createPromptText("Last Name:"), 0, 1);
        results.add(createInputField(model.lastNameProperty()), 1, 1);
        results.add(createPromptText("Email:"), 0, 2);
        results.add(createInputField(model.emailProperty()), 1, 2);
        results.add(createPromptText("Phone Number:"), 0, 3);
        results.add(createInputField(model.phoneProperty()), 1, 3);
        return results;
    }

    private Node createButtonBox() {
        HBox results = new HBox();
        results.setAlignment(Pos.CENTER_RIGHT);
        results.setPadding(new Insets(8));
        Button button = new Button("Save");
        button.setOnAction(evt -> saveAction.run());
        results.getChildren().add(button);
        return results;
    }

    private GridPane createTwoColumnGridPane() {
        GridPane results = new GridPane();
        results.getColumnConstraints().addAll(createJustifiedConstraint(HPos.RIGHT), createJustifiedConstraint(HPos.LEFT));
        results.setHgap(6);
        results.setVgap(4);
        results.setPadding(new Insets(4));
        results.getStyleClass().add("test-border");
        return results;
    }

    private ColumnConstraints createJustifiedConstraint(HPos alignment) {
        ColumnConstraints results = new ColumnConstraints();
        results.setHalignment(alignment);
        return results;
    }

    private Node createInputField(StringProperty boundProperty) {
        TextField results = new TextField();
        results.setMinWidth(100);
        results.textProperty().bindBidirectional(boundProperty);
        return results;
    }

    private Node createPromptText(String prompt) {
        Text results = new Text(prompt);
        results.getStyleClass().add("label-text");
        return results;
    }
 }
Which looks like this:

As you can see, we've now updated createInputField() to take a StringProperty as a parameter, and it's now bound to the Text property of the TextField. Back up in createGridPane(), it's easy to see how each TextField is bound to a Model property.
The "Save" Button is wrapped in an HBox so that it can be set up at the right-hand side of the screen. You could use an AnchorPane if you want to, and then attach it to the right side. The setOnAction() method of the Button just runs the Runnable.
One Last Refinement
The last 4 methods in ScreenBuilder don't really have anything to do with our entry screen at all. They're just generic methods to configure nodes that could appear on any screen in our application. So, let's make them static and move them to a new class, Widgets:
public class Widgets {

    static GridPane createTwoColumnGridPane() {
        GridPane results = new GridPane();
        results.getColumnConstraints().addAll(createJustifiedConstraint(HPos.RIGHT), createJustifiedConstraint(HPos.LEFT));
        results.setHgap(6);
        results.setVgap(4);
        results.setPadding(new Insets(4));
        return results;
    }

    private static ColumnConstraints createJustifiedConstraint(HPos alignment) {
        ColumnConstraints results = new ColumnConstraints();
        results.setHalignment(alignment);
        return results;
    }

    static Node createInputField(StringProperty boundProperty) {
        TextField results = new TextField();
        results.setMinWidth(100);
        results.textProperty().bindBidirectional(boundProperty);
        return results;
    }

    static Node createPromptText(String prompt) {
        Text results = new Text(prompt);
        results.getStyleClass().add("label-text");
        return results;
    }
}
Now our ScreenBuilder class only has about 70 lines of executable code, it's easy to read, and it's easy to understand:
public class ScreenBuilder implements Builder<Region> {

    private ExampleModel model;
    private Runnable saveAction;


    public ScreenBuilder(ExampleModel model, Runnable saveAction) {
        this.model = model;
        this.saveAction = saveAction;
    }

    public Region build() {
        BorderPane results = new BorderPane();
        Node headingBox = createHeadingBox();
        BorderPane.setMargin(headingBox, new Insets(4));
        results.setTop(headingBox);
        results.setCenter(createDataEntrySection());
        results.setBottom(createButtonBox());
        return results;
    }

    private Node createHeadingBox() {
        HBox results = new HBox();
        Text headingText = new Text("This is the Screen Title");
        headingText.getStyleClass().add("heading-text");
        results.getStyleClass().add("standard-border");
        results.getChildren().add(headingText);
        results.setPadding(new Insets(6));
        return results;
    }

    private Node createDataEntrySection() {
        HBox results = new HBox(10);
        results.setPadding(new Insets(2, 10, 4, 2));
        results.getChildren().addAll(createGridPane(), createBioBox());
        return results;
    }

    private Node createBioBox() {
        TextArea bioTextArea = new TextArea();
        bioTextArea.setWrapText(true);
        bioTextArea.setMaxWidth(200);
        bioTextArea.setMaxHeight(200);
        bioTextArea.textProperty().bindBidirectional(model.bioProperty());
        return new VBox(4, Widgets.createPromptText("Short Bio:"), bioTextArea);
    }

    private Node createGridPane() {
        GridPane results = Widgets.createTwoColumnGridPane();
        results.add(Widgets.createPromptText("First Name:"), 0, 0);
        results.add(Widgets.createInputField(model.firstNameProperty()), 1, 0);
        results.add(Widgets.createPromptText("Last Name:"), 0, 1);
        results.add(Widgets.createInputField(model.lastNameProperty()), 1, 1);
        results.add(Widgets.createPromptText("Email:"), 0, 2);
        results.add(Widgets.createInputField(model.emailProperty()), 1, 2);
        results.add(Widgets.createPromptText("Phone Number:"), 0, 3);
        results.add(Widgets.createInputField(model.phoneProperty()), 1, 3);
        return results;
    }

    private Node createButtonBox() {
        HBox results = new HBox();
        results.setAlignment(Pos.CENTER_RIGHT);
        results.setPadding(new Insets(8));
        Button button = new Button("Save");
        button.setOnAction(evt -> saveAction.run());
        results.getChildren().add(button);
        return results;
    }
}
The Stylesheet
.root{
    -theme-colour : #017987;
    -theme-deep-colour : derive(-theme-colour, -15%);
    -theme-font-colour : derive(-theme-colour, -50%);
    -theme-deep-font-colour : derive(-theme-font-colour, -50%);
    -theme-light-colour : derive(-theme-colour, +90%);
    -contrast-colour : #f89642;
    -contrast-deep-colour : derive(-contrast-colour, -20%);
    -near-black : #252535;
    -theme-font-family : 'Calibri';
}

.label-text {
    -fx-font-family : -theme-font-family;
    -fx-font-size: 17;
    -fx-fill: -theme-colour;
    -fx-font-weight: bold;
}

.heading-text {
    -fx-font-family : -theme-font-family;
    -fx-font-size: 24;
    -fx-fill: -contrast-colour;
    -fx-stroke: -theme-font-colour;
    -fx-font-weight: bold;
}

.standard-border {
   -fx-border-color : -theme-colour, -theme-deep-colour;
   -fx-border-insets: 0, 0 -1.4 -1.4 0;
   -fx-border-radius : 4px, 6px;
   -fx-border-width : 1.5px, 0 2px 2px 0;
}

.test-border {
    -fx-border-color : red;
    -fx-border-width : 0.5;
}
Wrapping Up
This article ended up being more about code style than JavaFX, but that doesn't really surprise me. There's nothing magical about JavaFX, it's just Java.
It took me much longer to write the text of this article than it did to write the code.
Much longer.
I wrote it and modified the code as I wrote the article, so I can't say for sure, but my guess is that the whole finished product would have taken about one cup of coffee for me to complete from scratch. Even less if I had used my own library of configuration methods and classes (a bit like the Widgets class we just created).
But yet it's not really a trivial screen. It does something. Add a proper Controller and an adapter to an external API or persistence layer and it's a fully functional application.
The Methodology
As you can see, building a screen by hand in JavaFX is fairly simple. Create a container, put some stuff in it and run it. Put some more stuff inside. If the new stuff needs a layout that your current container can't supply, then put your new stuff into its own container, and then add that to your original container. Keep on adding stuff to the containers, creating new containers as necessary until you're done. Keep running it over and over to see what the changes look like.
I hope this was helpful. I've seen quite a few people express confusion about how to start writing JavaFX code by hand, and there doesn't seem to be anything out there (until now) to show them how.
Let me know if this helps you, or if you have more questions.